Asset hierarchy
Build and maintain the five-level asset tree that everything else in the platform depends on: Production Site → Line → Section → Asset → Task Point.
Required role
Mapper or Admin.
Overview
The asset hierarchy is the spine of the platform. Every task lives on a task point; every NFC tag points to a task point; every schedule generates work at a task point. If the hierarchy is wrong or missing, nothing downstream works.
This page covers how to build, edit, import, and reorganise the hierarchy in the web portal. The same data model is editable on the mobile app — see Creating hierarchy (mobile).
The five levels
| Level | What it represents | Example |
|---|---|---|
| Production Site | A physical location — a factory, plant, or site. | Bandung Plant |
| Line | A production line within the site. | Weaving Line 3 |
| Section | A zone within a line (often drive side / operator side). | Operator side |
| Asset | A specific piece of equipment. | Loom L-314 |
| Task Point | The spot on the asset where a task is performed. | Main bearing grease point |
Tasks attach at the task-point level. So do NFC tags, schedules, and measurement history.
Prerequisites
- You have the Mapper or Admin role.
- You've thought about the naming convention you want to use before you start.
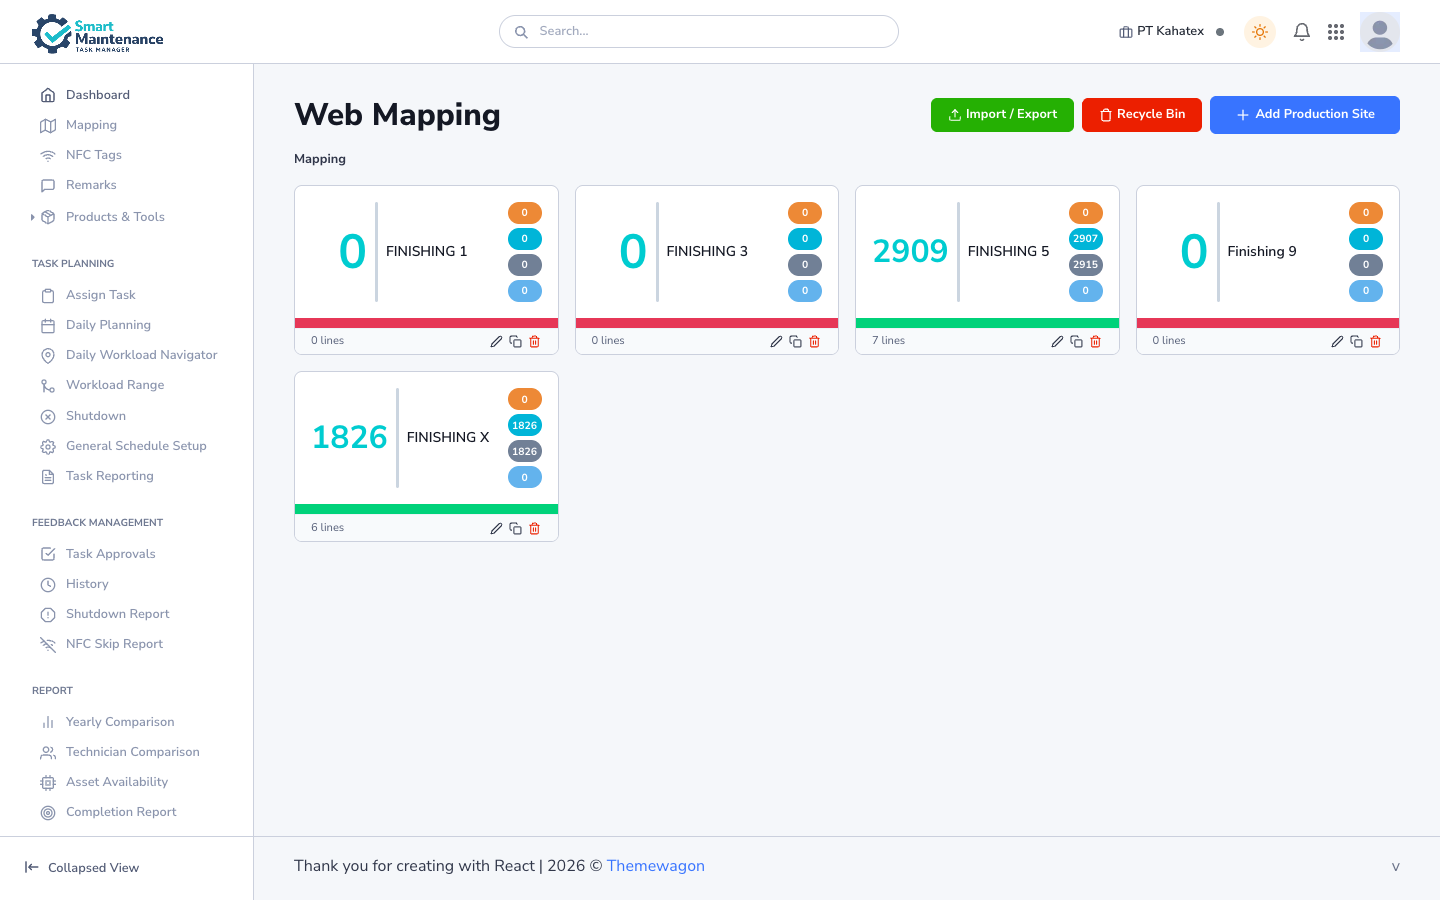
Open the mapping page
Mapping in the sidebar. You land on the Web Mapping page with a grid of production-site cards. Each card shows the site name, total task count, line count, per-task-type counters (Electrical / Lubrication / Mechanical / Production) and Edit / Duplicate / Delete controls. The top-right has Import / Export, Recycle Bin, and Add Production Site buttons.
Create a Production Site
- Click New production site.
- Fill in:
- Name — short, unique.
- Timezone — defaults to your company timezone; override if the site is in a different timezone.
- Address (optional) — shows on printable reports.
- Save.
The new site appears in the list. Click it to drill in.
Create Lines under a site
From the site's detail page:
- Click New line.
- Fill in:
- Name — stable, unique within the site.
- Order — lines display in this order. Leave the default to append.
- Save.
Create Sections under a line
From the line's detail page:
- Click New section.
- Name, (optional) description, order.
- Save.
Sections are optional — if a line is simple enough that zones don't add clarity, skip this level and put Assets directly under the line.
Create Assets
From the section (or line) detail page:
- Click New asset.
- Fill in:
- Name — unique identifier (asset code, equipment tag).
- Component type — links the asset to a component definition, which brings its default tasks with it. See Components.
- Order.
- Save.
Create Task Points
From the asset's detail page:
- Click New task point.
- Fill in:
- Name — concise, specific ("Main bearing grease point" not "grease point").
- Description (optional).
- Position indicator (optional) — helpful when an asset has many similar points.
- Order.
- Save.
Once the task point exists, you can:
- Attach one or more tasks.
- Register an NFC tag that points to it.
- Attach a safety procedure.
- Set up a recurring schedule.
Bulk import via CSV
For large hierarchies, typing everything is impractical. Use CSV import.
Format
One row per node. Required columns:
type,parent_name,name,component_type,order
production_site,,Bandung Plant,,1
line,Bandung Plant,Weaving Line 3,,1
section,Weaving Line 3,Operator side,,1
asset,Operator side,Loom L-314,Loom,1
task_point,Loom L-314,Main bearing grease point,,1
type— one ofproduction_site,line,section,asset,task_point.parent_name— must match thenameof the row that defines the parent.name— the node's own name.component_type— only forassetrows; blank elsewhere.order— display order under the parent.
UTF-8 encoding, comma delimiter, first row must be the header.
Running the import
- Mapping → Import.
- Select the CSV.
- Preview — the portal shows what it parsed. Errors (missing parents, duplicate names) are flagged here, before anything is saved.
- If the preview looks right, click Import.
- The import runs in the background. You'll see a progress bar; large imports (thousands of rows) can take a minute or two.
CSV gotchas
- Windows line endings are fine.
- Quoting: only quote fields that contain commas or line breaks.
- Names with embedded commas: quote the whole field.
- Duplicate names at the same level are rejected.
Edit an existing node
Click any node to open its detail page. Every field can be edited except the type (you can't turn a Line into a Section without deleting and recreating).
Common edits:
- Rename — takes effect immediately. All downstream references (tasks, tags, schedules) update automatically.
- Reorder — drag the node up or down in the parent's list.
- Add a description.
- Change the linked component (Asset level).
Move a node to a different parent
Drag and drop in the tree view, or click Edit → Parent on the detail page and pick a new parent.
Moving doesn't break tasks or tags
Tasks and NFC tags move with their parent. But think before you move — a task point that moves from one asset to another might not make sense in its new context.
Delete a node
- Open the node's detail page.
- Click Delete.
- Confirm.
What gets deleted
When you delete a parent, everything under it goes too. The portal warns you with a count:
Deleting "Weaving Line 3" will also delete 4 sections, 52 assets, and 312 task points. 180 tasks will be orphaned. Continue?
Orphaned tasks are archived, not executed, and become invisible to technicians. They remain in the audit log.
Deletion is destructive
Task history is preserved, but the structure that produced it is gone. Deactivating (rather than deleting) is safer when you're unsure — see below.
Deactivate instead
For equipment that's been decommissioned but you may want history on:
- Open the node's detail page.
- Click Deactivate.
- The node is hidden from new task generation and assignment, but visible in reports.
Searching the hierarchy
The global search (top of the page, or /) searches across all hierarchy names. Type a few characters — results show the full breadcrumb so you know which node you're looking at.
Visual editor (webmapping)
For plants where spatial layout matters — where technicians think about "the motor at the end of the line" — the Webmapping page gives a visual editor. Drag assets onto a background image of your plant to place them geographically; link each placement to an asset in the hierarchy.
This is optional. The hierarchy works fine without a visual layout.
Reorganising without re-entering data
Common refactors and how to handle them:
Adding a Section between a Line and its Assets
- Create the new Section under the Line.
- Move the Assets into the new Section (drag-drop or edit parent).
- Task history, tags, and schedules follow automatically.
Splitting one Line into two
- Create the second Line.
- Move Sections/Assets into the new Line as appropriate.
- Rename the original Line if it no longer represents the full scope.
Merging two Lines
- Move everything from Line B into Line A.
- Delete (empty) Line B.
Relationship to other features
- Components — linking an Asset to a Component brings the component's default tasks onto the Asset.
- Schedules — attached to tasks (which live on task points).
- NFC tags — registered against task points; written with the mobile app.
- Safety procedures — attached to tasks.
- Reports — every report can filter by hierarchy level.
Things to watch for
Plan the tree before you build
Restructuring a populated tree is much more work than structuring it once, carefully, up front. Talk to Supervisors and technicians before you commit.
Don't use the hierarchy for everything
The hierarchy is for physical equipment. Don't encode organisational concepts (shifts, crews, contracts) as hierarchy nodes — those belong in user/role configuration.
Names persist in reports
Reports historically reference the name as it was at the time of the task. Renaming is safe going forward, but historical reports may show the old name until you regenerate them.
Troubleshooting
| Problem | Fix |
|---|---|
| CSV import fails with "parent not found" | The row referencing this parent comes before the parent's own row — reorder. |
| Can't delete a node — "has dependencies" | Orphan / move the dependent tasks or tags first. |
| Rename doesn't update everywhere | Refresh. If still inconsistent, contact support with the before/after names. |
| Drag-drop reorder doesn't stick | Check for connection issues; the WebSocket may have dropped. |
Related topics
- Components — defining reusable equipment types.
- Scheduling — attaching recurring schedules to tasks.
- NFC tags — registering physical tags.
- Safety procedures — linking safety steps to tasks.
- Creating hierarchy (mobile) — the same data model from the mobile app.
- Mapper handbook — the role overview.
- File formats — CSV format details.